
This finishing technique allows you to create greeting cards from either fabric or perforated paper cross stitched projects. The instructions are provided for creating a card with a rectangular cut-out to display the cross stitch but the same technique can be used for a circular cut-out.

 Draw a line lightly down the center of the second piece of card stock along the fold created. On the left side of the center line, locate the center of that half by drawing two lines, one from the upper left corner to the bottom of the center line and the second from the lower left corner to the top of the center line. Draw a third line through the center going from top to bottom and a fourth through the center across (see diagram).
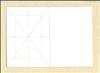 Using the marks drawn on the horizontal and vertical lines in step 4, draw four lines parallel to each edge that cross through the marks. This will outline the cut-out region where your project will be displayed.
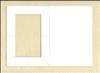
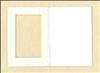
 Use the pen knife or a sharp razor to cut out the rectangle marked in Step 5.
 Affix four pieces of double-sided tape around the edge of the cut-out region.
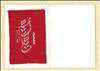 Trim your finished cross stitch 1/2" (1.27cm) beyond the region that will be displayed in the opening of the card. For this project, the opening is 3" x 5" ( 7.62cm x 12.7cm ) so you would trim your cross stitch to 4" x 6" (10.16cm x 15.24cm). Remove the backing from the double-sided tape and carefully center your cross stitched project in the opening. You may find it easier to place your cross stitched project face-up on a flat surface and then place the card over the stitching to ensure that the work is centered.
 Once pressed firmly together, place the card with the stitched project facing up along the edge of a desk or other surface that has a sharp edge. Place the second piece of card stock cut in step 2 over the front of the card. Align the edge of the card stock cover sheet with the edge of the desk. Place the steel ruler over the card along the fold line and hold down firmly. With your other hand, press the other half of the card down next to the edge of the ruler. Once a crease has been formed, pick the card up and press the two halves together along the fold. You may need to rub your fingernail or some other smooth object along the crease to ensure that it is completely folded.

 If the edges of the card do not line up exactly, place the metal ruler along the edge and cut off the excess using the pen knife.