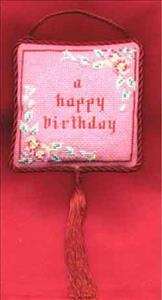
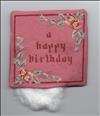
Filled Pillow With Optional Braid & Tassel Printer Friendly Version
This finishing technique is most often used to create ornaments but can also be used to complete any project that you want to hang. There are two parts to this approach, forming and stuffing the "pillow", and adding the braid and tassel. The braid and tassel are optional but add an elegant finish to the project.
Materials Required
- Polyester Fiberfil for stuffing
- Cotton or broadcloth fabric as backing
- Sewing thread and needle (or sewing machine)
- Floss for making braid and tassel
- Hot Glue Gun
- Iron
- Point Turner
Sewing and Filling Instructions
-
Determine the finished size you would like your design to be and add one-half inch (1.3 cm) of additional fabric on all sides. For example, if you want your finished design to be 3" x 3" (7.6 cm x 7.6 cm), you will need at least a 4" x 4" (10.2 cm x 10.2 cm) square of fabric. See Using the Fabric Size Calculator for details on how to quickly perform this calculation.
-
After stitching your project, trim the fabric to the size determined in step 1.
-
Cut a piece of cotton or broadcloth fabric for the backing making it the same size as the stitched square.
-
 Place the two pieces of fabric back-to-back with the finished sides facing together. Use clear tape to outline all four edges of the project. It should be placed one-half inch (1.3 cm) in from the edge of the fabric. The tape will be used as a stitching guide in the next step.
-
 Stitch a one-half inch (1.3 cm) seam by following the outer edge of the tape guide leaving a 1 1/2 to 2" (3.8 - 5 cm) opening along the bottom edge. This opening will be used to fill the project with the Fiberfil.
-
 Trim the excess fabric to within 1/8" (32 mm) of the stitched edge excluding the area near the opening at the bottom. You can use pinking shears instead of regular scissors to minimize raveling. Clip the corners at a 45 degree angle to ensure that the finished corner lays properly.
-
Turn the stitched fabric "outside-in" so that the back of the stitching is now on the inside. To do this, take the side of the stitching opposite the opening and push it through the opening. You may need to use a Point Turner to push the corners out completely. Iron flat with the stitching face down.
-
 Fill the ornament with Fiberfil from the opening left in the bottom. For a flatter ornament, use less filling. To create a fuller ornament, add more filling.
-
After adding the desired amount of filling, slip-stitch the opening at the bottom edge together.
Cording and Tassel Instructions
-
If you wish to make your own braid from floss that matches your project, refer to the instructions for making Braided Cording. Once complete, return to step 2 below.
-
Fold the braid in half to determine the center. Starting at the top of the ornament, hot glue the center of the braid to the top of the ornament along the seam and continue until you reach the center of the bottom. Repeat for the opposite side of the ornament.
-
You should have your ornament with a braid around the edge ending in two unfinished ends at bottom center. Cut three 6" lengths of floss, place together into one group, and tie around the two ends of cording at the bottom center of the ornament.
-
Wrap the 6" group of floss around the upper 1/2" of the loose braids to form a collar. Leave enough floss to tie securely to on of the strand.
-
 To form the tassel, untwist the two loose braids and carefully use a fine comb to separate the strands. Once complete, trim to the desired length.