
This is a quick and simple finishing technique for turning your perforated paper stitching into a greeting card using card stock and double-sided tape. One piece of card stock is used to make the card with a second piece forming a border for your cross stitch. Try to select a color which complements your stitching.

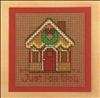
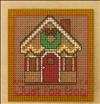 Trim your finished stitching to the same amount around all four edges. A good rule of thumb is to keep the border no more than 1/10 of the width or height. So if you project is 50 x 50, leave no more than 5 squares along each edge.
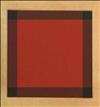
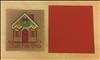 Decide how large of a border you would like to have around your stitched piece using the colored card stock that compliments your stitching. In general, a border that is between 1/8 and 1/4 of the width and height works well. For example, for a 2" x 2" (5.1cm x 5.1cm) project, 1/4" (6.4mm) border works well.
 Determine the width and height of the card based on the size of the border cut in the previous step. You can choose the card to open vertically or horizontally based on your preference. Once you have decided on the width and height of the card, cut the sheet of card stock chosen for the card to the desired width but twice the desired height and fold in half. For example, for a 5" x 7" (12.7cm x 17.78cm) card, cut the card stock to 10" x 7" (25.4cm x 17.78cm).
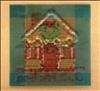 Turn over your stitched piece and affix four pieces of double-sided tape around the edge. It is okay if you overlap the pieces of tape. Trim any excess tape that went beyond you stitched piece using a small pair of scissors.
 Turn over your stitched piece face-up and center on the background cut in step 2. Press along the edges to make sure the tape is firmly affixed to the backing.
 Turn your stitched piece and background over. Affix four pieces of double-sided tape around the edge.
Turn back over and center your framed stitching on the front of your card pressing down on the edges to secure the tape to complete your card.
Turn your stitched piece and background over. Affix four pieces of double-sided tape around the edge.
Turn back over and center your framed stitching on the front of your card pressing down on the edges to secure the tape to complete your card.